If you’re concerned about your online privacy, private DNS can help. It lets you send network data to a custom, secure DNS server and encrypt those queries. Here’s how it works and how to set it up.
What Is DNS?
Before we look at private DNS, we should do a brief review of DNS itself.
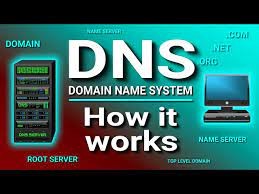
The Domain Name System (DNS) converts human-friendly web addresses into the IP addresses computers use to communicate.
Generally, a DNS server will perform the translation from URL to IP. This process is called a DNS transaction, and these occur every time you visit a website, use particular applications, or communicate over specific platforms.
These transactions, like the domain names, are unencrypted. This means that operators and others can easily see and log them, which can be problematic when the information is a security or privacy risk. There aren’t any privacy mechanisms to protect the transactions’ confidentiality.
Further, it can make you susceptible to particular forms of malicious cyberattacks (like man-in-the-middle attacks).
What Is Private DNS Mode?
Private DNS uses a different protocol called DNS over TLS (Transport Layer Security) and Hypertext Transfer Protocol Secure (HTTPS) to encrypt any DNS queries sent out. DNS used over these protocols are called DoH (DNS over HTTPS) and DoT (DNS over TLS).
Many malware, ransomware, and data theft attacks rely on DNS security weaknesses. This is where private DNS comes in. DoT and DoH encrypt the communication between your network and the DNS server and prevent third parties from intercepting the data.
How Do You Enable Private DNS?
The process will differ depending on your device/platform. To enable private DNS, you need to configure a DNS address on your device and have access to a third-party DNS server that includes DoT or DoH functionality.
Cloudflare offers a free private DNS service at 1.1.1.1 or 1.0.0.1 but logs some information. This DNS resolver is entirely free. Other free DNS options include OpenDNS, 1.1.1.1 with Warp, and Google.
How to Enable Private DNS on Windows 10
To use private DNS on Windows 10, follow the steps below:
- Press Windows + I to open Settings.
- Select Network & Internet.
- Select Network and Sharing Center under Advanced network settings.
- Select Change Adaptor Settings from the left-hand menu.
- Right-click the network you’re currently connected to and select Properties.
- Select Internet Protocol Version 4 (TCP/IPv4) from the list and select Properties.
- Select Use the following DNS server addresses and enter your preferred DNS address.
How to Enable Private DNS on Android
Google introduced support for DNS over TLS in Android 9, allowing you to use private DNS on your phone. To do this, you must have access to a private DNS server. Go to Settings.
- Open Settings.
- Select Connections > More Connection Settings.
- Select Private DNS.
- Select Private DNS provider hostname.
- Enter the address of the private DNS service you wish to use.
Note: If you’re using CloudFlare, the URL will be 1dot1dot1dot1.cloudfare-dns.com.
How to Enable Private DNS on a Mac
To enable private DNS on a Mac, do the following:
- Select the Apple menu.
- Select System Preferences > Network.
- Select the network connection you’re currently using and click Advanced.
- Click DNS, then select the Add button (the plus symbol) at the bottom of the list.
- Enter the IPv4 or IPv6 address for the DNS server you want to use.
- Select OK.
How to Enable Private DNS on an iPhone
To use encrypted DNS on an iPhone, follow the steps below:
- Go to Settings > Wi-Fi.
- Click on the information icon “i” next to your Wi-Fi connection.
- Scroll down and select Configure DNS.
- Select Manual.
- Click Add Server.
- Enter the address of the private DNS service you wish to use.
CloudFlare’s 1.1.1.1: Faster & Safer Internet App
You also can automatically set up a private DNS server on your Android or iPhone.
Apps like CloudFlare’s 1.1.1.1 Faster & Safer Internet will automatically configure your device to use the 1.1.1.1 DNS server. It’s a free app that functions without ads.
- Android: 1.1.1.1: Faster & Safer Internet
- iPhone: 1.1.1.1: Faster Internet
Check and Validate the DNS after Setup
Setting up a private DNS is not necessarily secure by itself. Once you’ve set up an alternate DNS address, it’s essential to check it to ensure your connection is safe. You can use several online tools to do this, including Cloudfare’s own security check tool.
This will double-check that your DNS queries are encrypted, whether your browser supports encrypted Server Name Indication (SNI), whether your DNS resolver is using Domain Name System Security Extensions (DNSSEC), and which version of TLS is being used.
Internet Privacy
Public DNS is one of the most significant security concerns on the internet, and configuring private DNS can protect you and your devices from malicious actors on the internet.
If this tip helps and you would like to donate click on the button. Thanks In Advance.
________________________________________________________________________________________________________
"Fortune Favors, Who Value Time over Money!"
"TeQ I.Q. was the 1st IT Company to Deliver Cloud Solutions since 2003"
Tech issues taking up your Time?
"TeQ I.Q. Makes Your Technology Secure and Protected"
Do you have Tech Frustrations like your Computer, Internet, Phone, Cellphone, Camera, TV, Car?
"Afraid of Online Hacking?"
"SECURE your Internet and Devices with before it's too late!"
For more info go to https://www.teqiq.com/vpn/
"We Take Away Your Tech Frustrations and Give You the Free Time You Deserve!"
Call Robert to ask all your Technology questions.
For Free Consultation Call Now Robert Black at (619) 255-4180 or visit our website https://www.teqiq.com/
Chase Bank and Others Trust TeQ I.Q. with their IT and TeQnology so can you!